
Chapter 1
Unlocking Mobile Conversion with App Clips
In today’s performance-driven marketing world, reducing friction in the user journey is key. One of Apple’s most underused tools in the conversion stack is App Clips—miniature versions of apps that deliver core experiences without requiring a full install. For growth teams focused on acquisition, conversion, and retention, App Clips offer a new surface for engagement at the precise moment of intent.
What Are App Clips?
App Clips are lightweight, on-demand portions of iOS apps (under 15 MB) designed to load instantly, enabling users to complete high-value actions—like ordering, booking, signing up, or paying—without installing the full app.
What Are App Clips Used For?
App Clips are built for just-in-time interactions—where app installation may cause unnecessary drop-off. Think parking payments, coffee ordering, product scanning in-store, or unlocking a rental bike. They’re ideal for physical-to-digital and web-to-app handoffs.
What Does the App Clip Actually Do?
Once triggered (via QR code, NFC tag, Safari Smart Banner, link in iMessage, or Apple Maps), the App Clip opens instantly. It can:
- Authenticate with Sign in with Apple
- Handle transactions via Apple Pay
- Store preferences with iCloud Keychain
- Prompt the user to install the full app post-interaction
This creates an end-to-end, no-install experience with all the power of native iOS capabilities.
Why Use App Clips?
For growth marketers, App Clips dramatically reduce acquisition friction, enabling contextual, high-intent micro-conversions. They are particularly powerful when:
- Users are unfamiliar with your brand
- The action required is one-off or transactional
- Your install-to-activation rate is low due to pre-download friction
App Clips streamline the funnel: one tap to action, instead of multi-step redirects and App Store detours.
When Should I Use App Clips?
Use App Clips when:
- You’re targeting real-world touchpoints (e.g., OOH ads, in-store QR codes)
- You want to drive single-action conversion without download barriers
- You need deep linking and context persistence (e.g., a prefilled cart or referral code)
How to Use App Clips
Practical Examples
- Retail: A user scans a QR code next to a product in-store and gets instant access to specs, reviews, and a “Buy Now” option.
- Food & Beverage: A restaurant table tent QR triggers an App Clip for one-tap ordering and Apple Pay checkout.
- Mobility: A passerby taps their phone on a scooter’s NFC chip and unlocks it instantly via App Clip.
From a data perspective, these interactions can be tracked in App Store Connect, which offers metrics like:
- App Clip card views
- Sessions
- Taps on “Open”
- Conversion to full app installs
These insights help attribute micro-moments to broader funnel performance.
Apple App Clips vs. Google Play Instant Apps
| Feature | Apple App Clips | Google Play Instant Apps |
| Launch method | QR, NFC, Safari, Maps, iMessage | URLs, Banners, Google Ads |
| Size limit | ≤ 15 MB | ≤ 10 MB (Lite) |
| Payments | Apple Pay | Google Pay |
| Tracking | App Store Connect | Google Play Console + Firebase |
| App install prompt | After interaction | Optional, post-usage |
While both enable instant app functionality, App Clips are more tightly integrated into Apple’s ecosystem (e.g., Apple Pay, Maps, Sign in with Apple), whereas Google Play Instant Apps lean on web-like flexibility and ad network compatibility.
Apple App Clips are about to change the way you think, and; moreover, they will probably change the way that we interact with our environment using our mobile devices. iOS14 App Clips enable you to do ‘here-and-now’ activities using your device almost instantly without sacrificing privacy or sharing your geolocation.
App Clips requires app developers to understand a few new concepts and develop the App Clip alongside their app, which may require some refactoring.
Important: This blog is based on the actual development of an App Clip that was thoroughly researched with careful documentation, and video, collecting all App Clips related WWDC 2020 videos, with iOS 14 release notes, post-release experience. See the full app and paired App Clip here.

Chapter 2
The App Clip Invocation flow
This section will cover the App Clip life cycle – from a user who interacts with an App Clip to the various methods of switching to the full app.
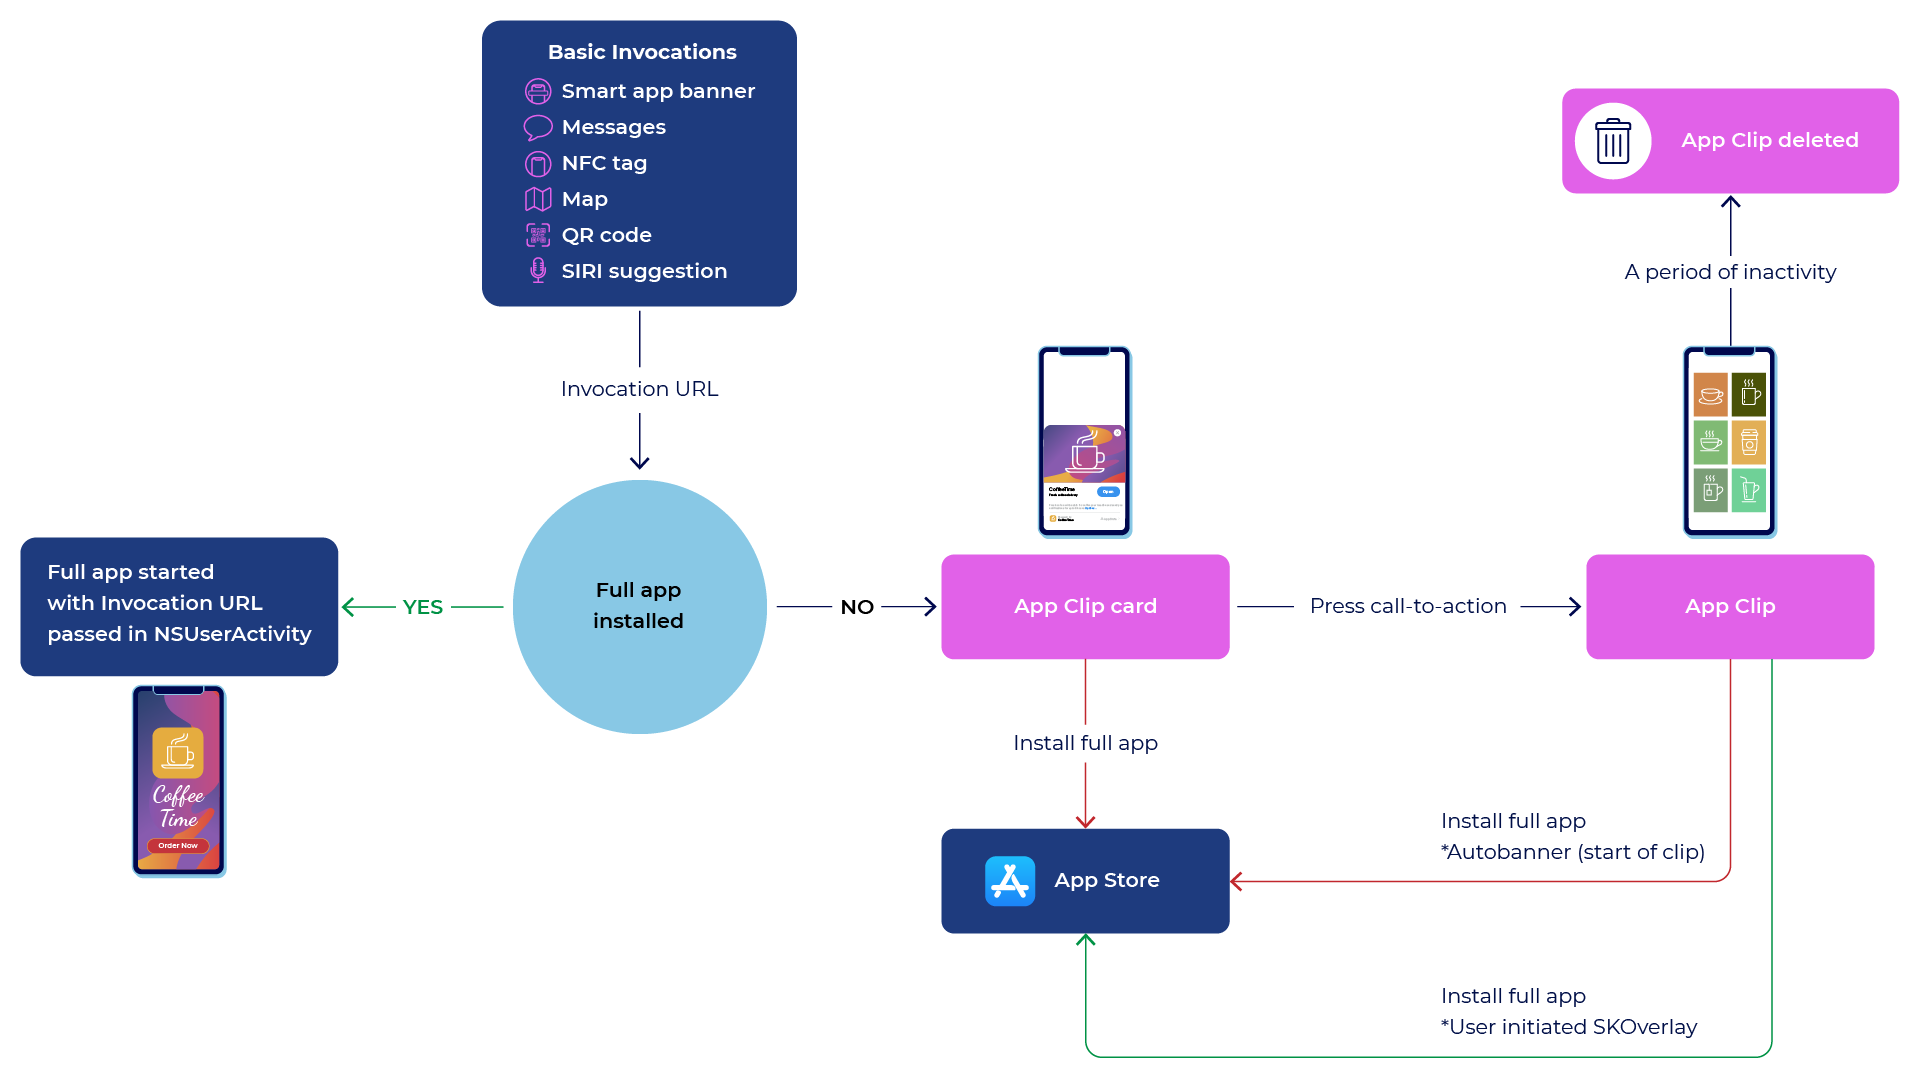
App Clips starts when a user interacts with an Invocation.
Invocations are a very important notion in App Clips which we’ll go into full detail.
Let’s assume the user tagged an NFC tag, which is an App Clip Invocation.
This is what follows:
- The iOS system detects that the NFC tag is an App Clip Invocation and extracts an ‘Invocation URL’.
The Invocation URL defines the functionality expected from this Invocation. It will be passed to the App Clip together with all the data needed to point the user to the functionality required to service the NFC tag. If the app is already installed, the app will be launched and the Invocation URL will be passed along just as it’s passed in a Universal Link flow.
Important notice for developers: The invocation URL is not passed to the full app if the user chooses to install the full app from the App Clip Card or from the App Clip banners. In these types of cases, the user must trigger the invocation again (scan the QR code or tap the NFC tag). The invocation URL will then be passed in NSUserActivity as described above.
The developer can pass the invocation URL from the App Clip to the full app using shared storage.
Here are a few examples:- https://megacoffee.com/buy/paris/table/6 – The App Clip is opened in the buy menu of the Paris branch where table #6 is already set-in the preferences. The user identifies via Apple Sign-in, pays using Apple Pay, and voilà, the order is complete. This flow requires location verification, explained in full detail here.
- https://scooter.me/rent?scooter_id=3456 – The App Clip is opened in the rent menu with a scooter ID already set-in place. The App Clip can notify the user that their rent period is about to end. This flow requires an App Clip notification, explained in full detail here.
- https://megacoffee.com/buy/paris/table/6 – The App Clip is opened in the buy menu of the Paris branch where table #6 is already set-in the preferences. The user identifies via Apple Sign-in, pays using Apple Pay, and voilà, the order is complete. This flow requires location verification, explained in full detail here.
- The iOS verifies the Invocation URL which is indeed valid, by reading an Apple-App-Site-Association (AASA) file from the Invocation URL domain. Setting the AASA file is explained in full detail here.
- Once the Invocation URL is verified, the iOS presents an App Clip Card to the user.
While any given app can only have one App Clip, developers can create several cards for different experience use cases.
Each App Clip Card is associated with a single App Clip Experience (App Clip experiences are explained in full detail in Chapter 5).
The iOS system displays the App Clip Card of the Experience which is the closest match to the Invocation URL that the user has clicked.
The App Clip Card is then presented by the system, without any developer interaction or code involved.
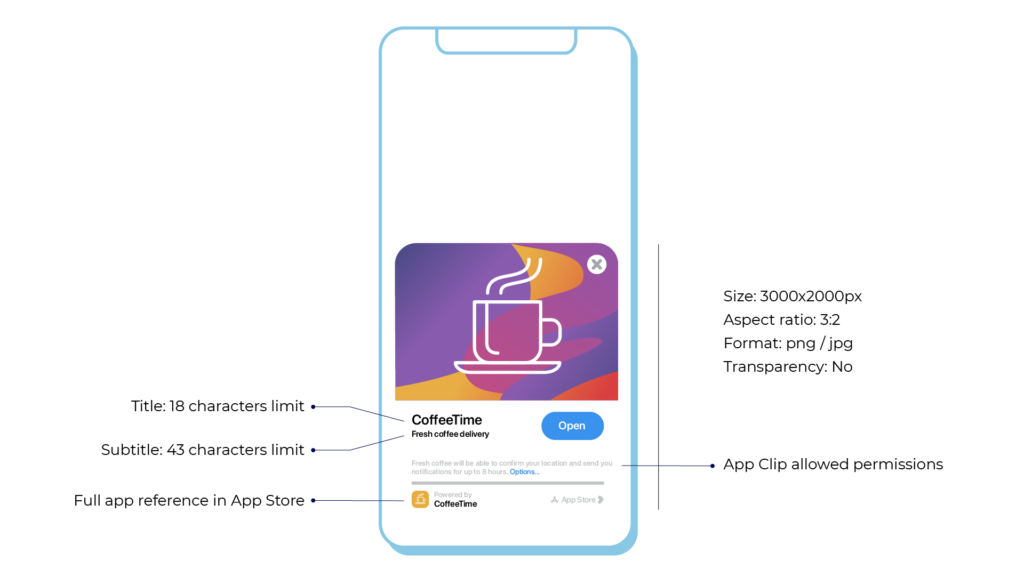
The App Clip Card serves a few purposes:
- It presents the user with a general introduction as to the functionalities of the App Clip, which is similar to the App Store app page on a full app download flow. This could be presented as a picture of the coffee shop with a short description of the business.
- It states permissions from the developer and enables the user the option to turn them off. Please note, that iOS14 App Clips have very few permissions and contain a very small list. As an added bonus, users will gain confidence with App Clip’s stronger privacy policy.
- It presents a call-to-action button, which informs the user of the main functionalities expected from the App Clip, such as: to rent, buy, share, or check-in, etc.
- It places a small banner which directs the user to the full version of the app in the App Store.
When the card’s call-to-action is clicked, the iOS downloads the App Clip from the App Store. This is done quickly as the maximum size of an App Clip is 10MB.
For reference, this is quite a decent size as recently-submitted apps have an average size of 38MB.
The Invocation URL is passed to the App Clip via NSUserActivity. The developer uses the URL to create a deep link to the specified functionalities. The developer can use parameters from the URL, for example, the developer may extract the branch name and table number from the URL in this example: https://megacoffee.com/buy/paris/table/.
When the App Clip initially uploads it will display a banner that directs the user to the full app in the App Store. The developer can display the banner again using SKOverlay which is described in full detail here.


Chapter 3
Invocations and Experiences for Apple App Clips
This section describes in detail how an App Clip is invoked, which App Clip Card is displayed, what data is passed into the App Clip, and how.
An App Clip is generated from an Invocation.
An Invocation is not just a click, as you are probably familiar with from Universal Links.
An Invocation is an object created by Apple, which currently only Apple tools or infrastructure can create for you. It remains unclear on how you attain an ‘App Clip URL’ which would allow you to simply send via SMS, or place behind a QR code (we will update this process as soon as Apple provides more clarity).
Invocation methods
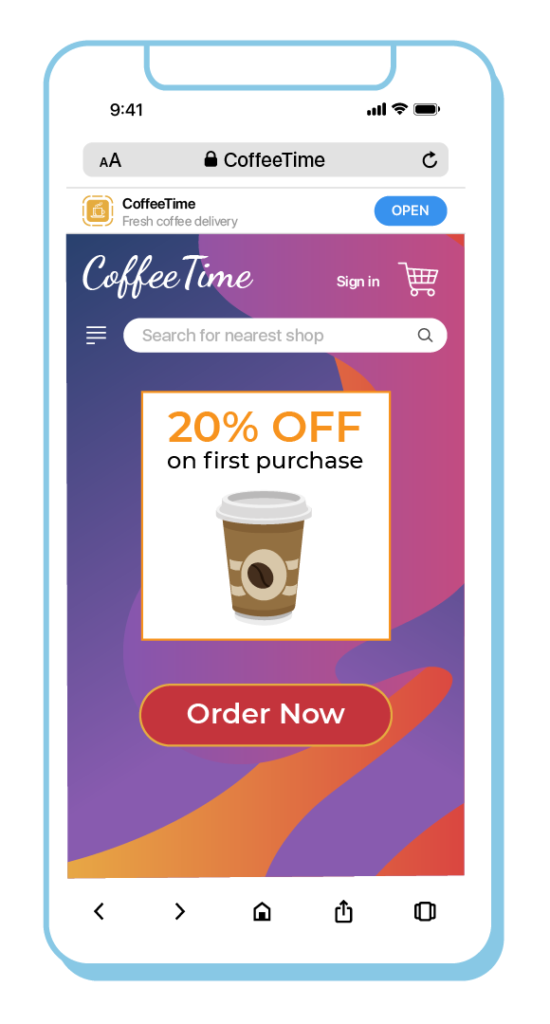
Safari Smart App Banner
Metadata can be added to the header of a website in order to create a Smart App Banner that will be presented in Safari.
Here is a sample code snippet that you are required to add:
The app-id is included in cases where the device is running on iOS 13 or earlier.
At this time the banner will direct the user to the full app within the App Store.
For this click, the URL that presents the banner is the Invocation URL.
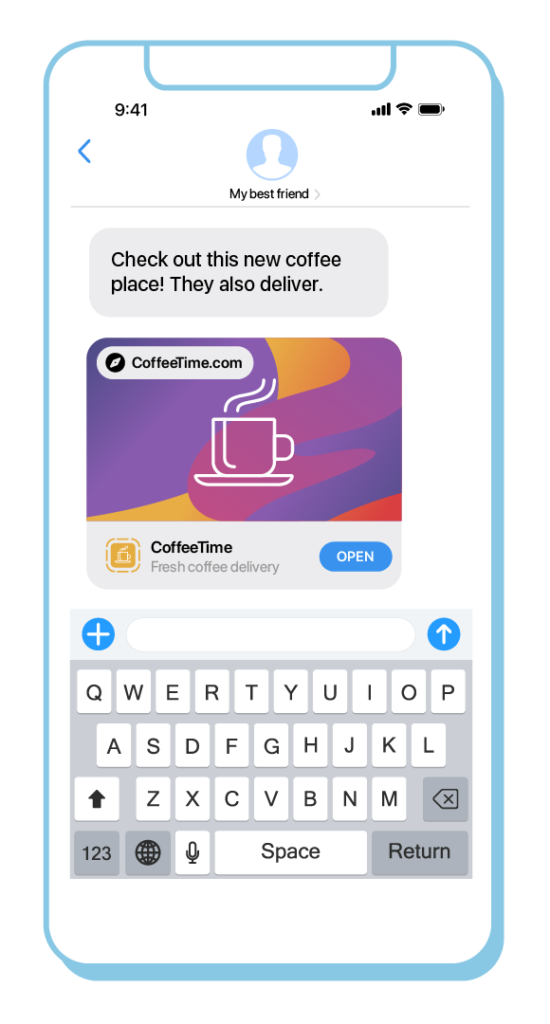
iMessages
When a user shares a link to a site that displays a smart banner, the message will present a banner that will invoke an App Clip.
The Invocation URL, in this case, is configured in the site’s URL.
NFC tag
- A tap on a tag, which encodes an Invocation URL associated with an App Clip, will invoke the App Clip.
- An Invocation URL is configured inside the tag.
- The NFC tag can be created using any tool or infrastructure, capable of creating NFC tags readable by Apple devices.
- The tag can be read even when the screen is locked.
Get the latest marketing news and expert insights delivered to your inbox
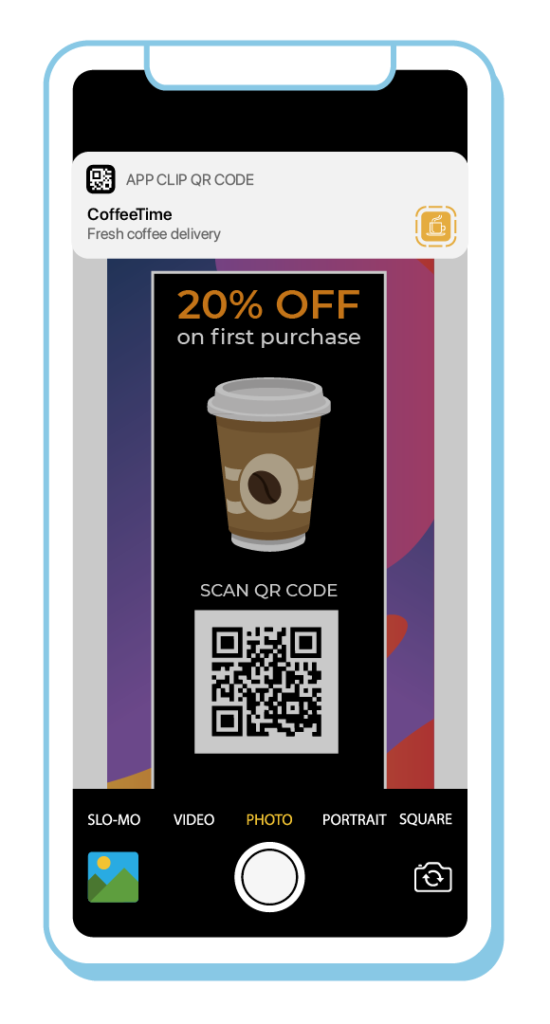
Visual codes
- App Clips can be invoked using any QR code, which encodes an Invocation URL associated with an App Clip.
- In order to invoke the App Clip, the QR code must be scanned using the Camera app or Apple’s native Barcode reader.
- Apple plans to release a visually distinct code that will host both an NFC tag in the middle, surrounded by a circular scannable code. One of Apple’s goals is to familiarise iOS users that when you tap or scan this code it will direct you to an App Clip.
Locations
Location-based suggestions from Siri – Apple has yet to share the full disclosure (updates to come).
Maps
Tags on a map may include a tag that invokes an App Clip. Verifying the App Clip’s Invocation URL is described in full detail here.
Every App Clip Invocation is associated with an Invocation URL.
The URL always starts with `https://mygreatapp.com/`. `https` is the scheme and `mygreatapp.com` is the host or domain.
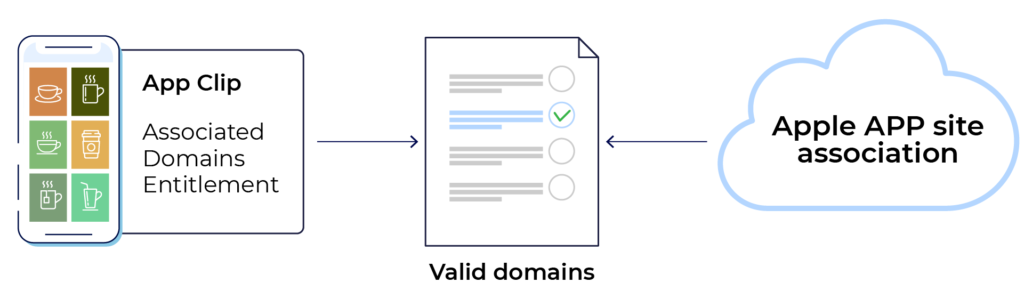
iOS must verify the Invocation URL to ensure that the publisher of the App Clip indeed owns the domain. If not, the user is most likely vulnerable to fraud and other malicious acts.
Since the scheme is ‘https`(as opposed to ‘http’), the Invocation URL will be verified using the SSL certificate, ensuring the App Clip developer owns the domain.
iOS verifies the domain by accessing an Apple-App-Site-Association (AASA) file. This file is usually known for verifying Universal Links for a given domain.
In order to verify iOS14 App Clips you must add the following section to the AASA file:
{
“appclips”: {
“apps”: [“ABCED12345.com.fruitstore.feedmeapp.Clip”]
}
…
}
Important note about AASA files: Apple announced at WWDC2020 that they intend to improve the access mechanisms of the AASA files from devices. Instead of the devices fetching the AASA directly from the domain associated with a given app, Apple fetches the AASA files and caches them in a CDN. The devices will access Apple’s CDN, and aggregate the AASA files fetching into more optimal reads and operations.
As a result, App Clips may increase the number of AASA file fetches, and this proposed mechanism could aid in decreasing this.
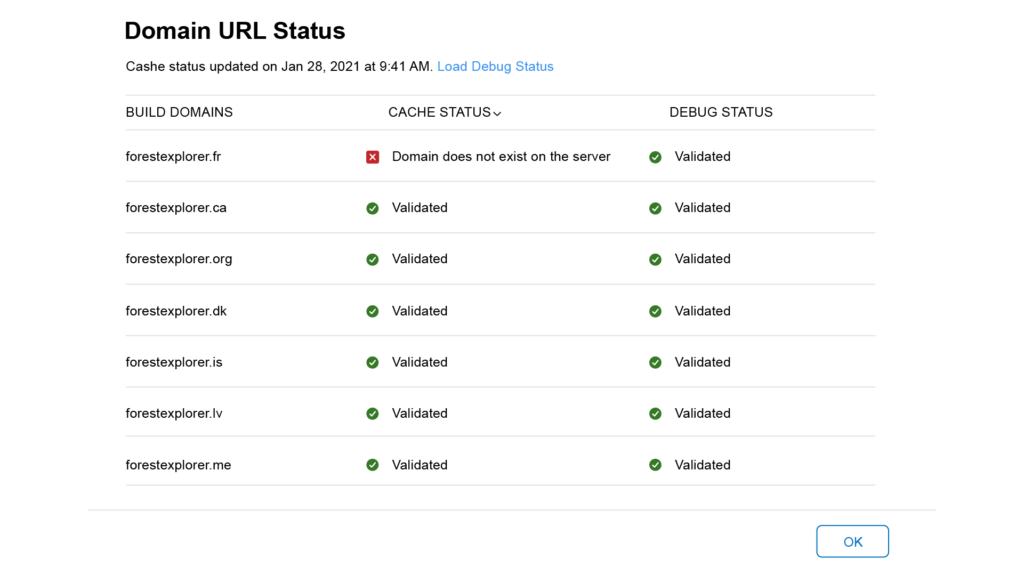
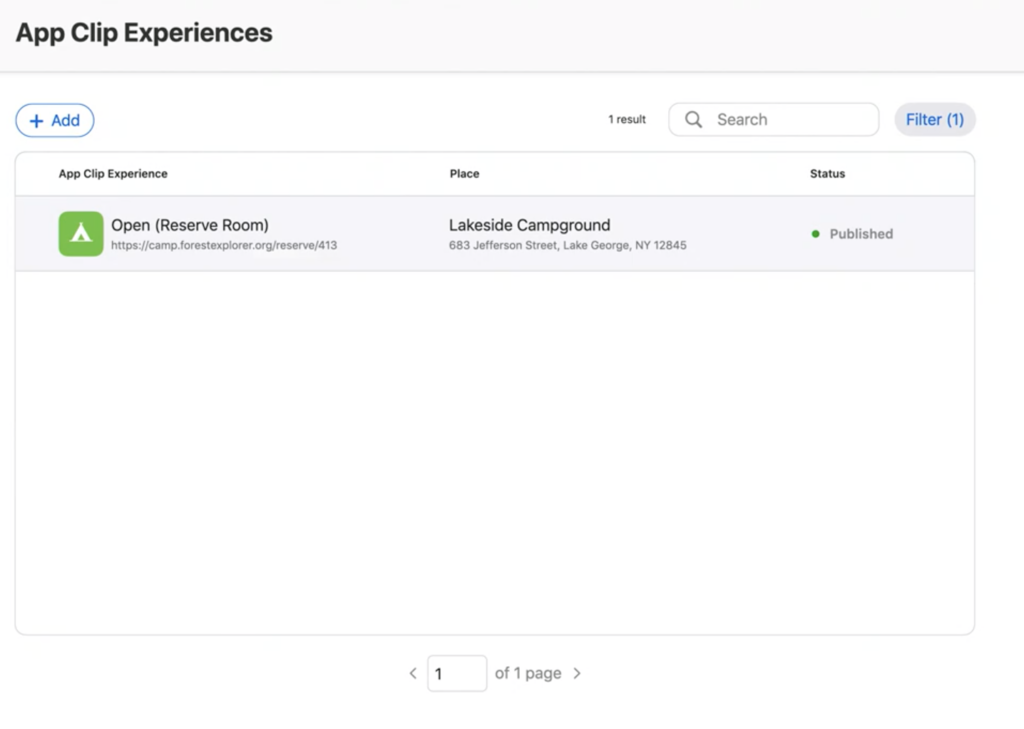
The state of this cache in relation to the Invocation URLs defined for a specific App Clip can be found in App Store Connect version information under ‘Domain URL Status’.
The build must have a valid App Clip (‘HAS APP CLIP’ value is ‘YES’).
The cache status column is what drives App Clip Invocation on the customers’ devices. Clicking ‘Debug Status’ enables Apple with access to your AASA file in real-time and validates the URLs. The Domain URL status is displayed above.

Chapter 4
App Clip Experiences
The most important term to understand about Apple App Clips is probably its Experiences.
An App Clip Experience is an action offered to the user, for example, buying, renting, checking into a hotel, and the list goes on. Each Experience displays a different App Clip Card. If you’d like to display a specific App Clip Card, you must define a specific Experience.
So, how is an Invocation matched to an Experience, and how does this display the relevant App Clip Card?
As we learned above each Invocation carries an Invocation URL. iOS matches the Invocation URL against URLs that you registered as a part of your App Clip Experience. It will display the App Clip Experience together with the URL that has the specified matching prefix.
For example, creating an App Clip experience with https://myrental.com/rent as the URL to cover URLs like https://myrental.com/rent/car, https://myrental.com/rent/suv, and so on and so forth.
However, if a business has multiple operations, it is recommended that you configure App Clip Experience for one or more operations, and use a different App Clip Card and Invocation URL for each operation.
For example, https://myrental.com/rent/car/il, https://myrental.com/rent/car/jp, etc.
Default App Clip Experience
In App Store Connect, on the page, ‘new app version’, you must configure a default App Clip Experience and provide the following metadata for the App Clip card:
- A header image.
- A subtitle that provides more information about the App Clip.
- A call-to-action that appears on the button users will tap to launch the App Clip.
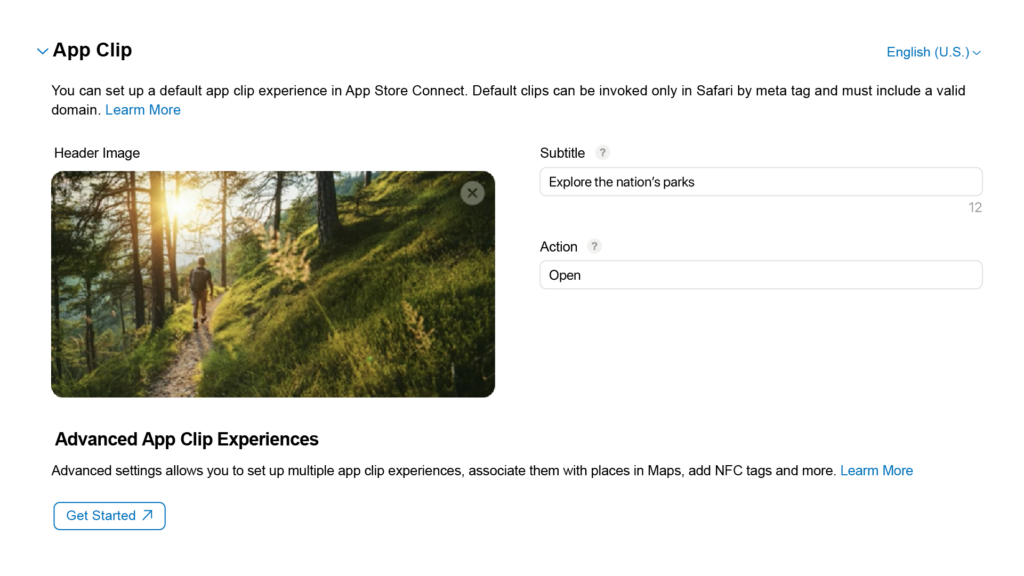
A default App Clip Experience is used to fire an App Clip from Smart App Banners and links that users share in the Messages app when Advanced App Clip Experiences are not configured.
No Invocation URL is required to register a default App Clip Experience.
If the system verifies an App Clip it will show the default, even if no Invocation URL was defined (see next section). Again, this is true only for Smart App Banner in Safari or links shared for these sites in the Messages.
Advanced App Clip Experience
Advanced App Clip Experiences allows you to do the following:
- Support all possible Invocations, including Invocations from NFC tags, and visual codes.
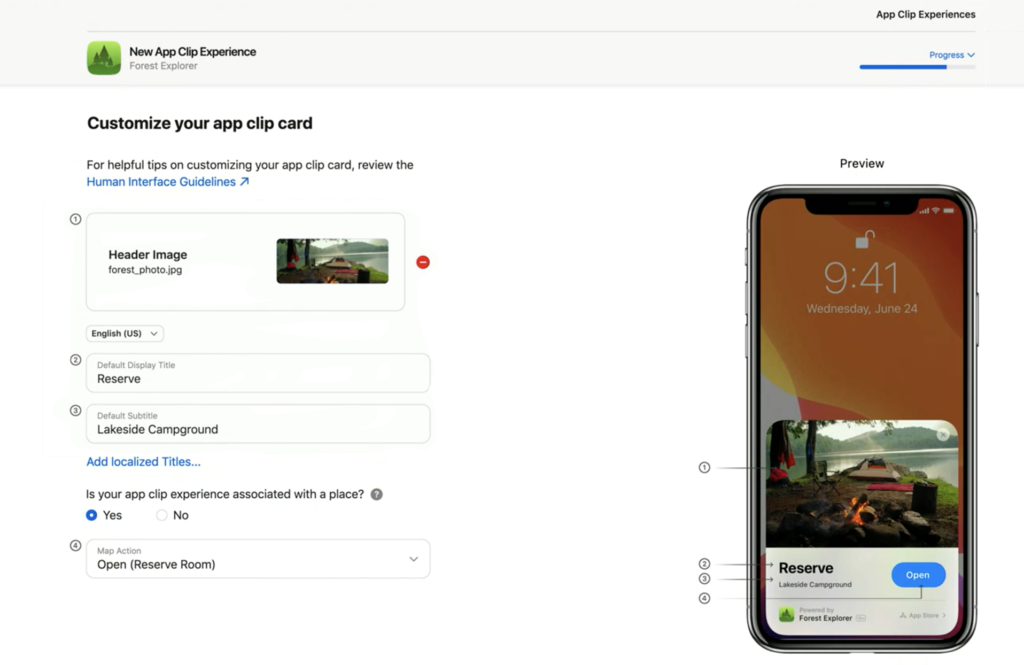
- Associate your App Clip with a physical location.
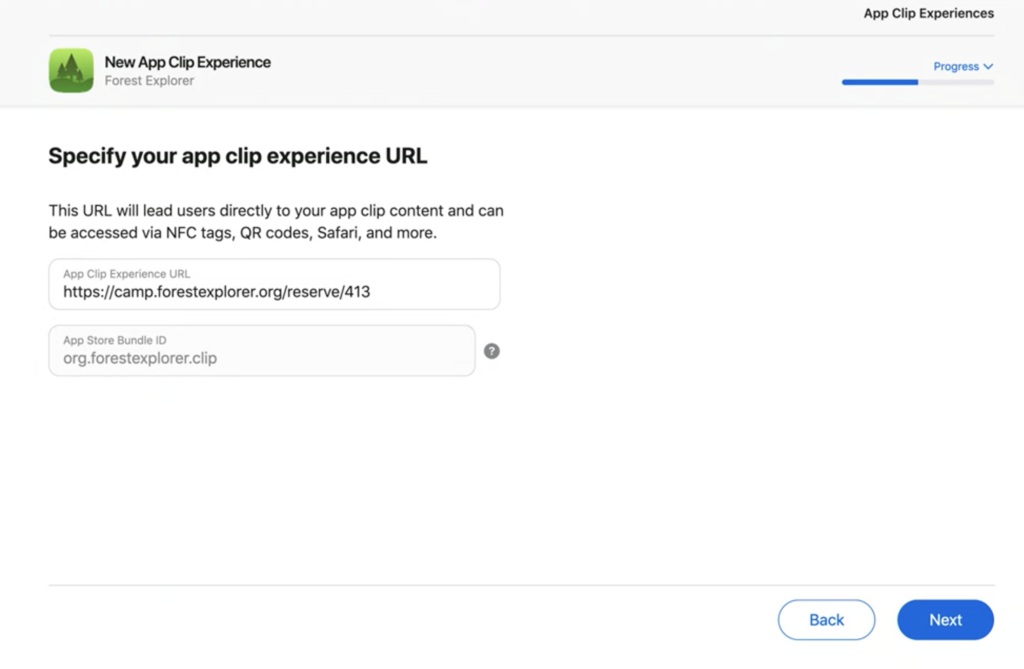
- Associate an Invocation URL with your App Clip.
As previously described, this enables the use of several App Clips Cards for various business cases. Each experience will lead to a specific card, customized in the App Store when creating the App Clip Experience.

Chapter 5
Developing an App Clip
To easily experience Apple App Clips we have created a simplified sample app that demonstrates the usage of App Clips and its integration with a full application.
The sample shows the following App Clip features:
- App Clip creation.
- Configured Associated Domains Entitlements for both iOS14 App Clips and Universal Links in the full app.
- Sharing resources between the full app and App Clip.
- Extracting the Invocation URL from NSUserActivity in both the full app and App Clip.
- Notifications.
- Passing data from the App Clip to the full app using App group.
- Verifying location.
- Recommending the full app from the App Clip using SKOverlay.

Chapter 6
App Clip limitations
Apple has imposed several limitations on App Clips to allow users to enjoy instantaneous functionality with maximum privacy and transparency.
These limitations serve to provide the user with greater control over their privacy and become more confident with the privacy standards of the app:
- App Clips are limited to 10MB in size.
- App Clips are not included in iOS backups (this is actually more of a feature than a limitation).
- The following frameworks are not available to App Clips: CallKit, CareKit, CloudKit, HealthKit, HomeKit, ResearchKit, SensorKit, and Speech. Using any of these frameworks in an App Clip does not result in compile-time errors, but their APIs return values that indicate unavailability, empty data, or error codes at runtime.
- Limit App Tracking is always enabled in Apple App Clips, to protect user privacy and prevent user tracking across apps and App Clips. App Clips cannot request authorization to track a user with AppTrackingTransparency, and both name and IdentifierForAdvertisers (IDFA) and IdentifierForVendor (IDFV) return all-zeros string.
- App clips cannot perform background activity, such as background networking with URLSession or maintain Bluetooth connections when the App Clip is not in use.
- To protect user data, Apple App Clips cannot access:
- Motion and fitness data.
- Apple Music and Media.
- Data from apps like Contacts, Files, Messages, Reminders, and Photos.
- An App Clip cannot share data with any other app, except its corresponding full app.
- An Important limitation is location access. App Clips cannot request continuous location access. This may create an issue with Invocations that are associated with a geographical location. It is important to verify that the Invocation URL (e.g. https://mybigcup/seattle/table/17) is indeed in Seattle, so as to avoid the confusion of the user paying someone else’s bill. For this purpose, Apple App Clips allow users to verify the device location inside a polygon, instead of accessing an exact location. However, for continuous location access, they may request the <When In Use> authorization, which resets automatically to the next day at 4:00 AM local time.

Chapter 7
Testing iOS14 App Clips
Apple App Clips can be tricky to test, as the Invocation flow begins within the system and involves App Store Connect. Thus, when initially creating the App Clip, you will need to rely on the following measures to test the invocation:
Testing the processing of the Invocation URL
A critical step in testing an App Clip is to ensure that the incoming Invocation URL is:
- Extracted successfully from the NSUserActivity.
- Parsed correctly with its parameters.
- Runs the appropriate flow.
Injecting an Invocation URL into a test, the steps are as follows:
- Click Product -> Edit Scheme…
- Set the Environment variable _XCAppClipURL to the Invocation URL value.
- Run the App Clip scheme on the target. The NSUserActivity will hold this value.
To view an example of this code click here.
Get the latest marketing news and expert insights delivered to your inbox
Testing appearance of an App Clip Card using Local Experiences
The appearance of an App Clip Card is an important part of user interaction. This is tested at the early stages, prior to submitting the application to App Store Connect and before setting the Apple-App-Site-Association file in your domain.
Setting Local Experiences is equivalent to setting Advanced Experiences in App Store Connect.
Local Experiences limitations:
- It is possible to invoke the App Clip Card using two methods:
- QR code (read using the native iOS Barcode reader)
- NFC tag
- Supported from iOS 14.2 combined with Xcode 12.2 and above.
- Local Experiences override the Advanced Experiences in App Store Connect.
- Local Experiences can only launch an app that is signed for Development, Ad Hoc, or TestFlight. It cannot launch an App that is already published to App Store Connect.
How to set Local Experiences:
- Ensure that your device is enabled to developer mode.
- Connect your iOS 14.2 and above device to Xcode 12.2 and above using a cable.
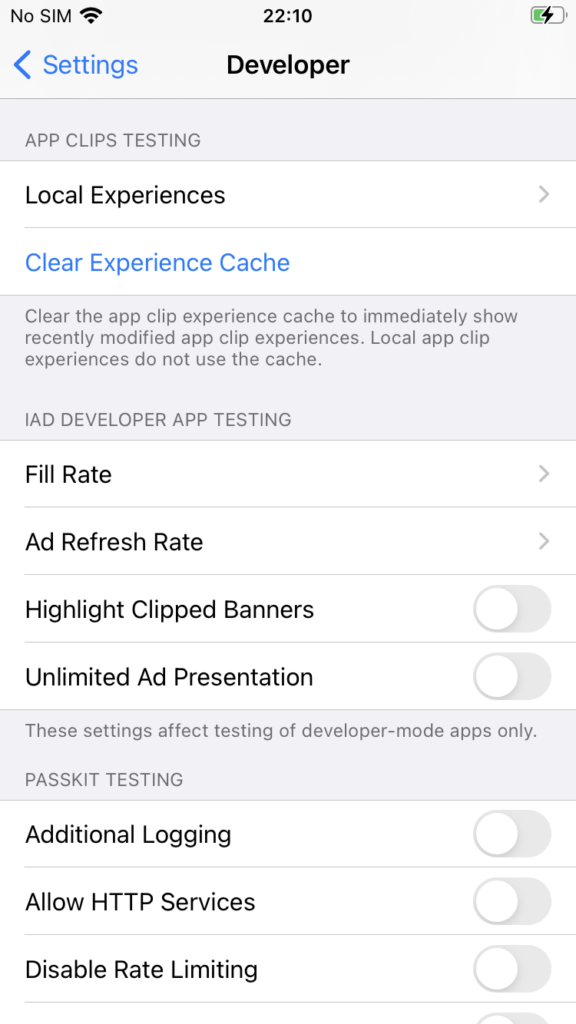
- Go to Local Experiences – Settings -> Developer -> Local Experiences (under ‘APP CLIPS TESTING’ section).
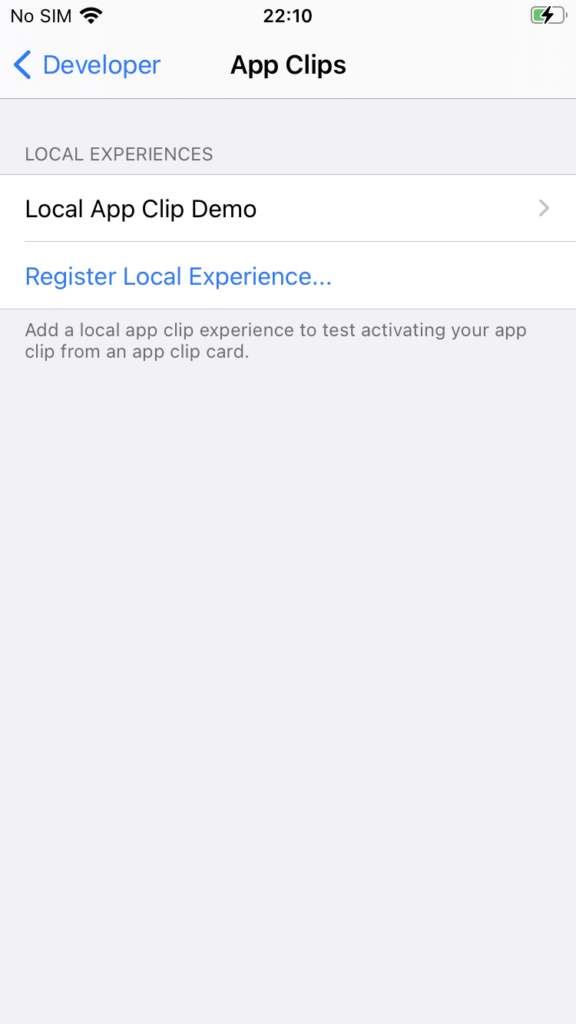
- Create a new experience by choosing `Register Local Experience…`
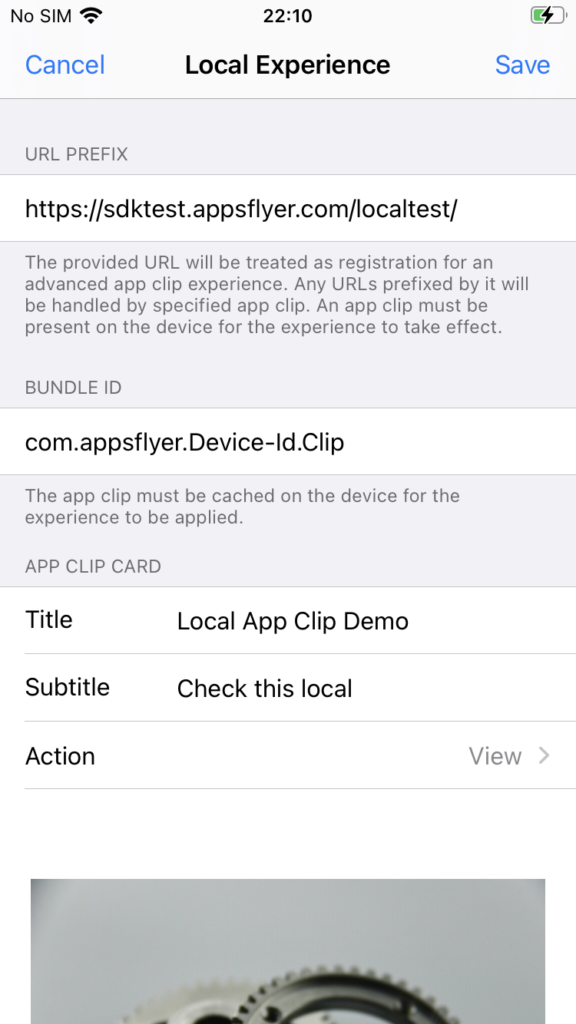
- Create the Experience as you would create an Advanced App Clip Experience within App Store Connect.
How to invoke using Local Experiences:
- Add an App Clip to your device using the following methods:
- Build and run the App Clip using Xcode.
- Create an ipa file for the App Clip using the Archive functionality in Xcode, and install it on the device.
- Distribute the App Clip to users via TestFlight.
- Scan a QR code using the native iOS barcode reader or tag an NFC. The QR code and NFC must encode an Invocation URL which overlaps with the URL defined in the Local Experience. This corresponds to the same overlapping rules of Advanced Experiences in App Store Connect.
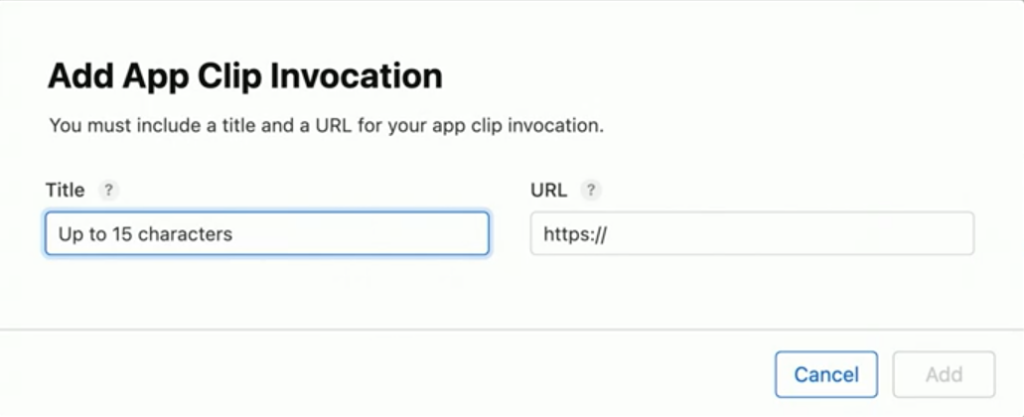
Testing after submission to App Store Connect
When submitting the full app and App Clip to the App Store you can define App Clip Invocations in the TestFlight tab. Each Invocation is defined with its Invocation URL.
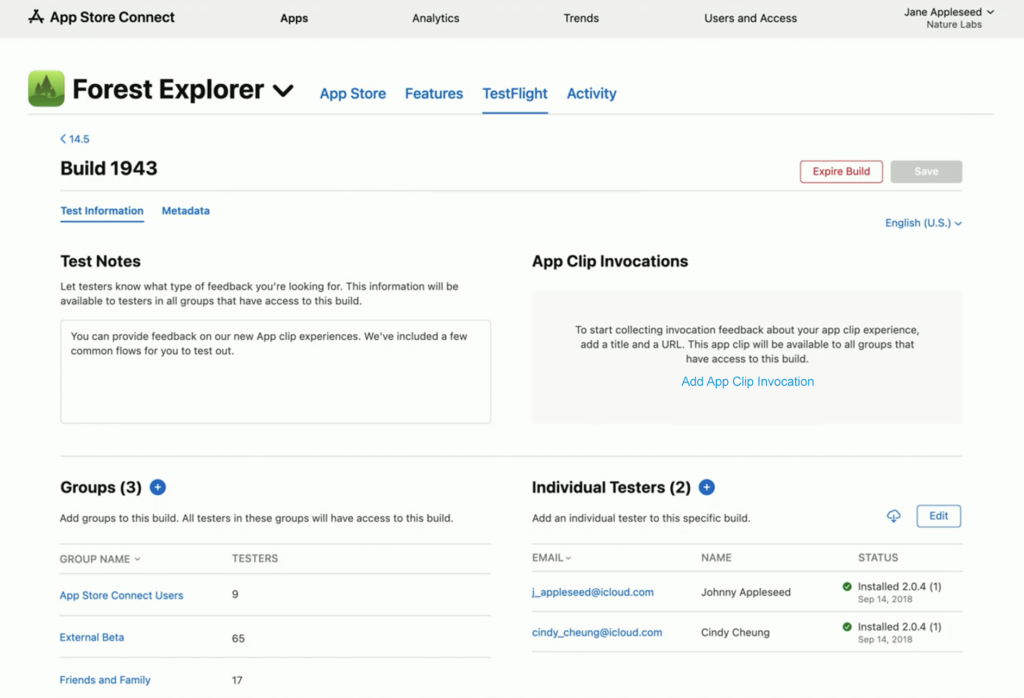
The app’s beta testers recognize the Invocations in the TestFlight and run the App Clip as if an Invocation was clicked using the Invocation URL as defined in the previous stage.

Chapter 8
Conclusion – The here-and-now is here
App Clips represent a new stage in how applications will be consumed and developed while providing iOS users with greater instantaneous functionality. This enables designers and developers greater freedom.
App Clips user experience can be categorized into two phases:
- ‘Here-and-Now’ – An App Clip for interactions between the user and their immediate environment, carried out in a simple but highly secure way.
- ‘On-Going-Universal’ – A full app that allows the user to constantly engage with the app’s functionality and receive notifications and services globally.
Apple did an excellent job in creating the infrastructure for these two phases, and for designing a seamless transformation between the App Clip to the full app phases.
We believe that many businesses can, and should, leverage this new technology to provide their customers and users with greater value and better interactions. We compiled this comprehensive guide to assist you in extending your knowledge about Apple App Clips.
For more information please visit Apple App Clips documentation.